How To Set Up Gmail with Your own Domain free forever
One way to send and receive email through your own custom domain is to use a third-party mail service, such as the mail service included with G Suite (Gmail) / Zoho or Office 365. The main benefit of using a third-party mail service, as opposed to managing your own mail server, is that you can avoid performing the ongoing maintenance that running a mail server entails. This tutorial will show you how to set up Gmail with your own domain.
Before proceeding, you should own the domain name that you want to use as your mail domain. If you do not already own a domain, you may purchase one from any of the various domain registrars.
In a web browser, go to the ggappsfree.com’s Plans & Pricing page and choose the appropriate plan (10 users, 50 users, 100 users, 200 users or higher plans) by clicking on Purchase Now button.
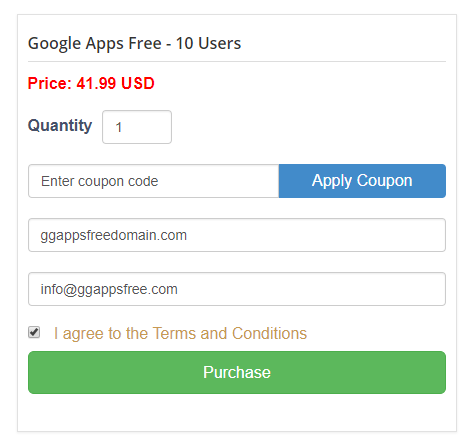
For the first step, enter your domain name and delivery email (we will send a verification mail to this email) into the input box. Click the Purchase button and you will have to redirect to Paypal to pay your order. At this point, after receiving your payment, we will send to your email a verification email with two verification methods are add TXT and CNAME records to your domain DNS (Google must verify that you own the domain).
Create TXT Record
In a different browser tab, log into your Domain Control Panel. Click on your domain name to view and edit the associated records. Next, select the TXT record type. Enter @ into the HOSTNAME field, and paste the “Value” provided by ggappsfree.com into the VALUE field.
Alternative method is create CNAME record
Open a second browser tab or window and log into your host’s website. You’ll add the CNAME record to your domain’s DNS records that are stored with your domain host. Next, select the CNAME record type. Paste the “CNAME Label / Host” value into the HOSTNAME field, and paste the “CNAME Destination / Target” provided by ggappsfree.com into the VALUE field.
TXT / CNAME records changes can take up to 72 hours to go into effect, but typically they happen much sooner. If you have a trouble on adding the record, you can contact your domain host for help adding the TXT / CNAME record.
After you have verified ownership of your domain, you may delete the verification record that you created.
Initiate Verification Process by using your Paypal email (which used to pay your order) and reply the verification email from ggappsfree.com. After receiving your email, ggappsfree.com will process the setup process and send you super admin user with your own domain credentials back to your email addresses. So now you already have Gmail with your own domain.
At this point, you must log into the Google Admin Console using the credentials we sent to you earlier. Near the top of the admin console, you will see this:
You will click the Next button to proceed to the next step in the setup. This is assuming that you only need one mail user or that you will set up additional users later.
Click the Set up Gmail button to go to the Domain Setup page.
At the Domain Setup page, click the Set up email button.
Next, tick the I have successfully logged in checkbox.
Tick the I have opened the control panel for my domain checkbox.
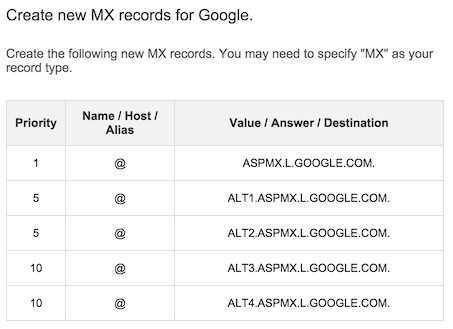
Now the Domain Setup page will ask you to create new MX records, and you will see this:
Go back to your domain DNS management page, and ensure you have the desired domain selected.
Select the MX record type and create MX records like the instruction.
Go back to the Google Domain Setup. Tick the I have saved the MX records checkbox, then click the Verify button.
Once the MX records are verified, click the Continue Setup button.
Your Google Apps mail with a custom domain setup is now complete!


Leave a comment